Quantcast
Channel: XO | Noelle
Viewing all 925 articles
Browse latest View live

LORAC Mega Pro Palette 2 | Swatches + Review

$
0
0
Hey pumpkins! How was your weekend? Mine was pretty great. My fiance came back from his work trip and I've been playing with this new palette all weekend. It's the LORAC Mega Pro Palette 2 - and guys, it's STILL available at Ulta (it's an exclusive) for $59!

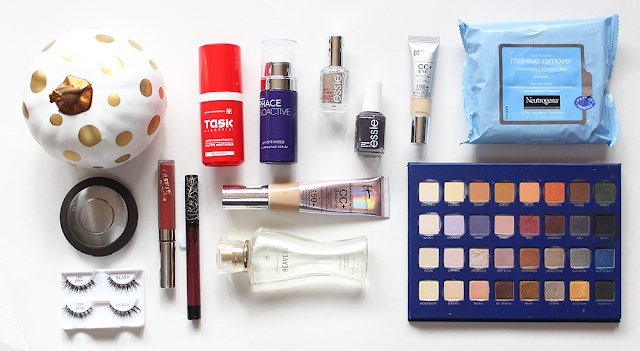
The LORAC Mega Pro Palette 2 ($59) is an exclusive to Ulta Beauty but will not be limited edition and is a permanent addition to LORAC at Ulta. This palette was created my celebrity makeup artist Carol Shaw and is loaded with 16 shimmer shadows (bottom two rows) and 16 mattes (top two rows). These shadows are infused with soothing botanicals and can be used wet or dry! 

The palette itself this time is a deep navy blue with the name in silver. It's the exact same size at last year's palette (5.7" x 7.7") and includes a large built-in mirror on the top half of the palette.

  • Porcelain - (matte) a off white with a yellow undertone. Very silky and smooth. A smidge on the powdery side but totally workable.
  • Custard(matte) a super pale yellow. Same as Porcelain. So, so buttery to the touch but a teensy bit powdery. Again, not a huge problem at all.
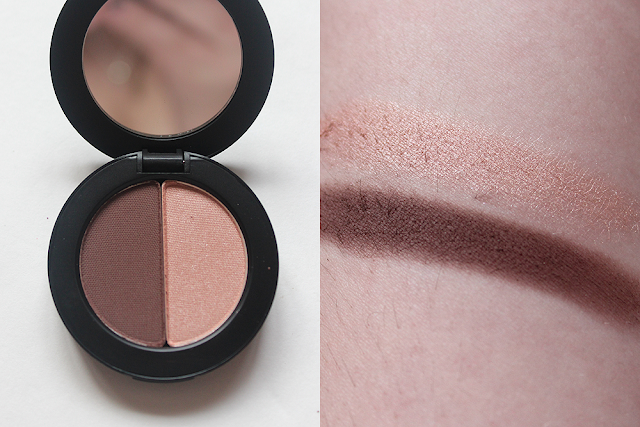
  • Tawny(matte) a medium brown with an almost red undertone. Such a gorgeous color but a smidge on the dry side which caused it to apply a bit sheer. Could probably work better over a primer or base. Love this as a crease shade!
  • Burlap(matte) a medium brown with yellow undertone. Another crease shade fave! Pigmentation was on point and was very buttery to apply.
  • Melon(matte) a light coral. Melon was pretty powdery (as you can see in the swatch) but actually applied better on the lid than swatched on the arm. I must also note that the pigmentation was still great.
  • Tangerine(matte) a soft orange with red undertones. Swoooooooon! One of my favorite shades from the palette. I mean, look at that pigmentation! Buttery soft and easy to apply with little fall out.
  • Saddle(matte) a dark brown. Saddle played nice and wasn't powdery at all. Very soft, easy to apply, little fall out and opaque.
  • Forest(matte) a blackened forest green. What a tough color to photograph but it's so gorgeous in person! Very opaque and pigmented, buttery soft but had some fall out.
  • Bisque - (matte) a light pinky beige. Great color payoff for such a light color (sometimes they fade easier than darker shades). A bit powdery but easy to apply.
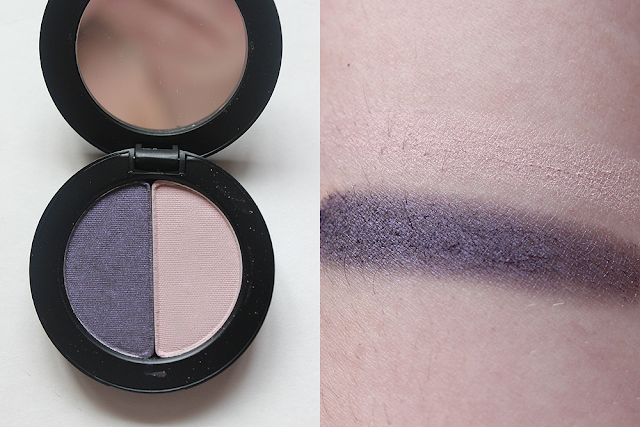
  • Lavender - (matte) a light lavender purple. Powdery and needs to be built up to achieve a good level of opacity. 
  • Purple - (matte) a purple with some cool tones. Kind of a bummer for me. While it wasn't powdery, it applied weird and patchy on the arm as well as the lid. 
  • Sorbet - (matte) a light dusty pink. Applied a little sheer but can be built up for a good level of opacity. Soft and buttery to the touch.
  • Goji - (matte) a muted reddish plum. There's something about burgundy/plum shades that just pull at my heartstrings! Gorgeous shade. Applied very nicely, a smidge on the powdery side but absolutely fine to work with. Pigmentation was great!
  • Cabernet - (matte) a dark burgundy with brown undertones. A little on the dry side but applied well. Pigmentation was okay but faded slightly at the five hour mark.
  • Ash - (matte) a dark purple with grey undertones. Ash is a chameleon type of color because it doesn't look very purple in the pan but once applied - oh hello! Ash was a little dry but applied okay. 
  • Black - (matte) a black. It's so hard to find a good, opaque black. This was a good black but I wouldn't say it was the best. A little chalky but it did build up to a nice solid black.

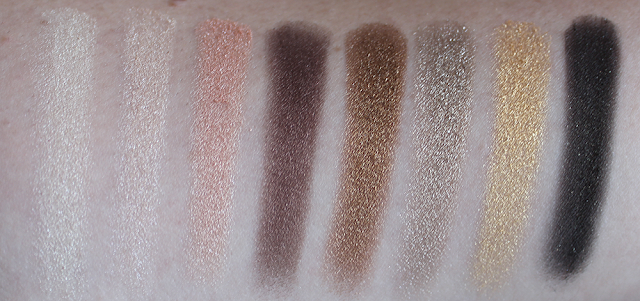
  • Sugar - (frost) a champagne. Hello beautiful! Amazing color pay off with a slightly powdery but totally workable texture.
  • Chiffon - (frost) a pink-toned champagne. Another awesome color pay off with a slightly powdery texture. Again, totally workable.
  • Prosecco - (metallic) a warm (almost rosey) beige. I absolutely love this color! Smooth, buttery texture even though it appears almost "chunky" in the swatches. I think it's just the way it reflects because it was anything but.
  • Soft Plum - (pearl) a soft rosey plum. Unfortunately, this shade just didn't do it for me. Very sheer and had to be built up to even get the less-than-opaque swatch seen above. 
  • Cinnamon - (metallic) a copper. Oh, Cinnamon! Gorgeous pigmentation, smooth application, little fallout.
  • Sandstone - (frost) a medium taupe. Slightly dry but amazing pigmentation nonetheless. Great color pay off and smooth to apply.
  • Gunmetal - (metallic) a dark steel gray. Heart eyes, guys, all the heart eyes. Fabulous texture and color pay off. 
  • Blue Quartz - (frost) a bright blue. Blue Quartz was slightly dry for me but still had great color pay off and applied well.
  • Moonlight - (frost) an off-white. While I wouldn't say opacity was at 100% with the first swipe on the arm, it's definitely buildable. No fallout and felt like butter!
  • Seashell - (frost) a light beige-y yellow. Buttery soft texture and applied fabulous. Great color pay off as well. 
  • Peony - (frost) a light peach. Slightly crumbly but applied very well and had a great color pay off.
  • Dark Sienna - (pearl) a medium chocolate. No words, guys, no words. SO pigmented and applied like butter. 
  • Penny - (metallic) a blackened bronze. Gorgeous color payoff and has a great buttery soft texture.
  • Olivine - (frost) a light gold with olive undertones. I know it sounds like a broken record but again, gorgeous pigmentation and a soft, buttery texture. Slight fall out from the shimmer.
  • Gold Leaf - (frost) a light yellow gold with gold shimmer. Oh Gold Leaf, I had such high hopes for you. Unfortunately, this shade was very crumbly and I could barely apply it to the lid without it getting everywhere. Applying this wet helps a little bit but it sheers out. 
  • Black Ivy - (shimmer?) a deep, blackened green with a subtle micro-shimmer. I didn't expect this to be as pigmented as it was but hot damn, it's awesome! Super opaque, applied very nicely and had little fallout.
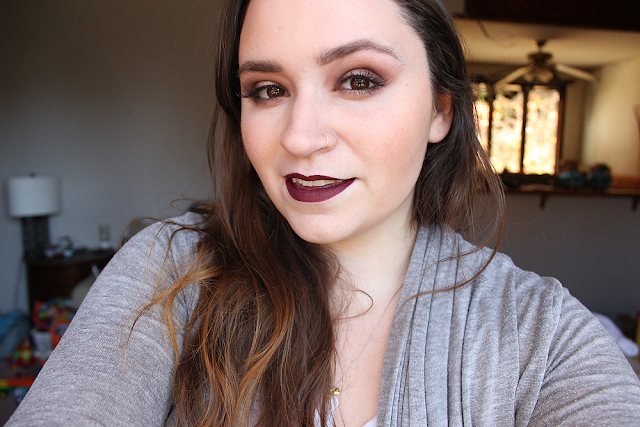
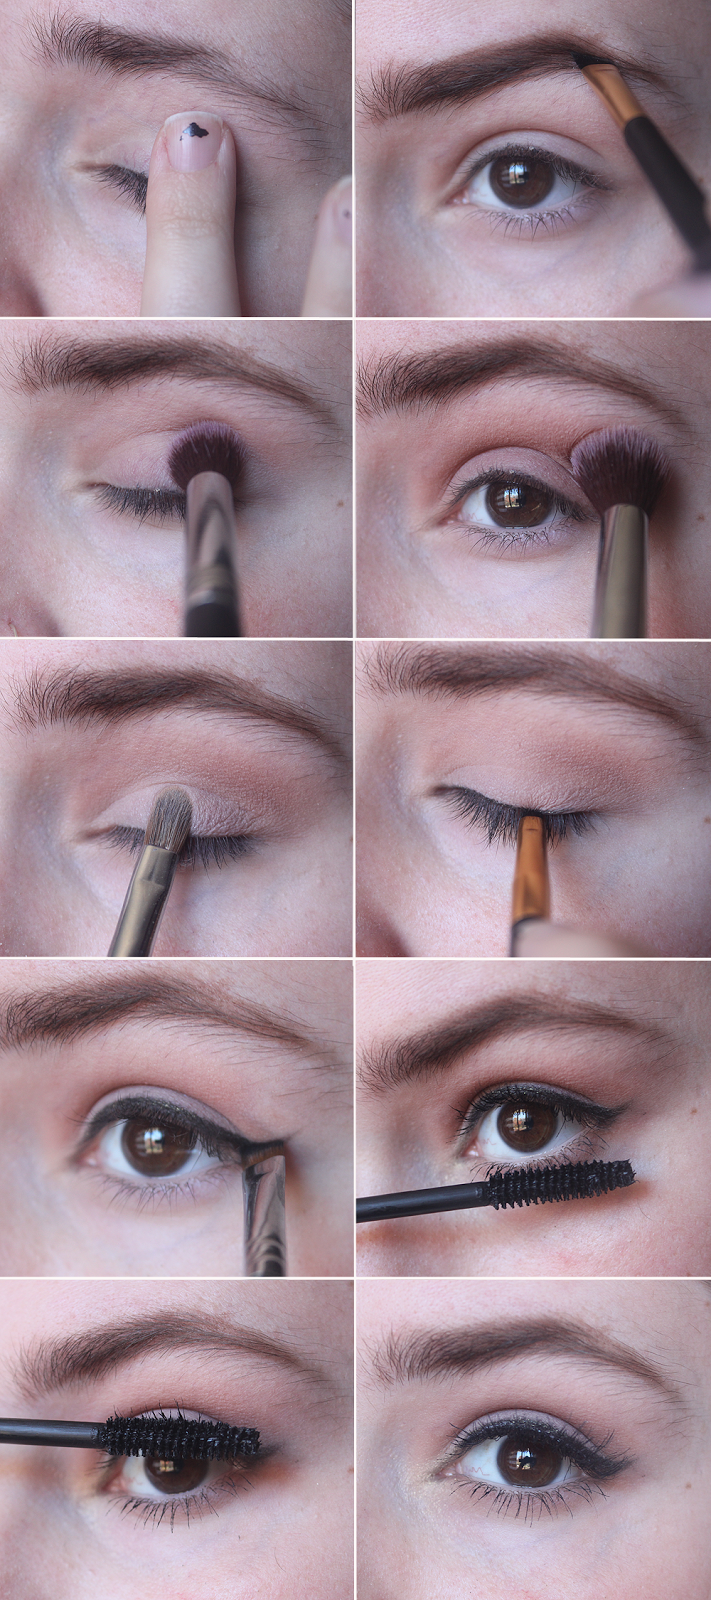
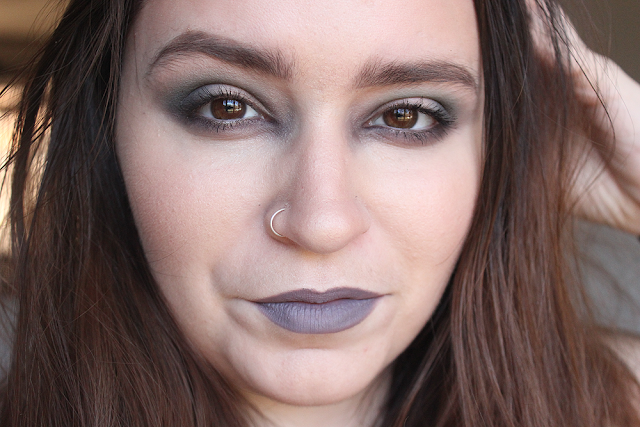
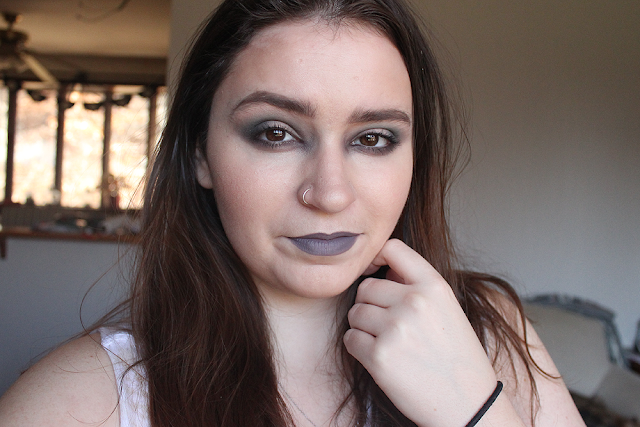
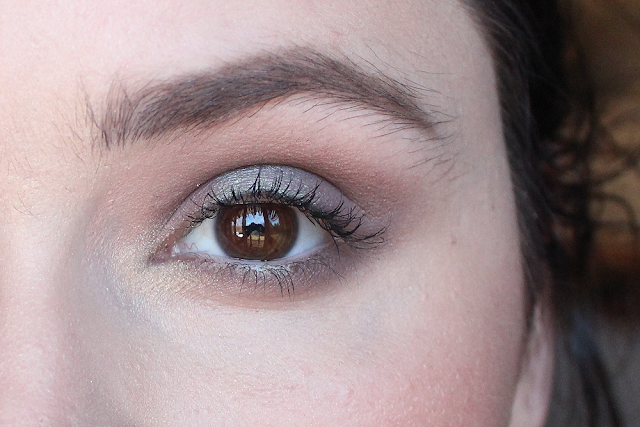
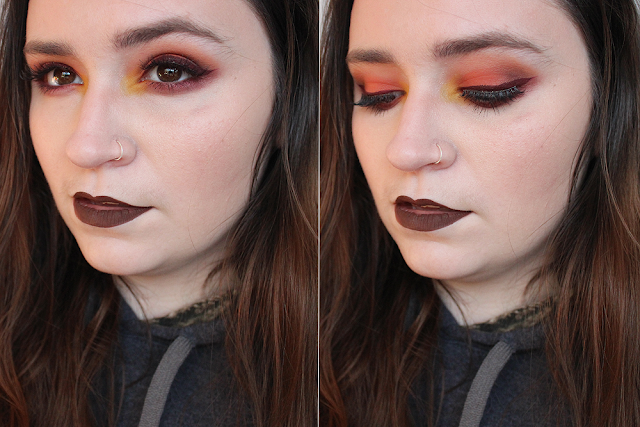
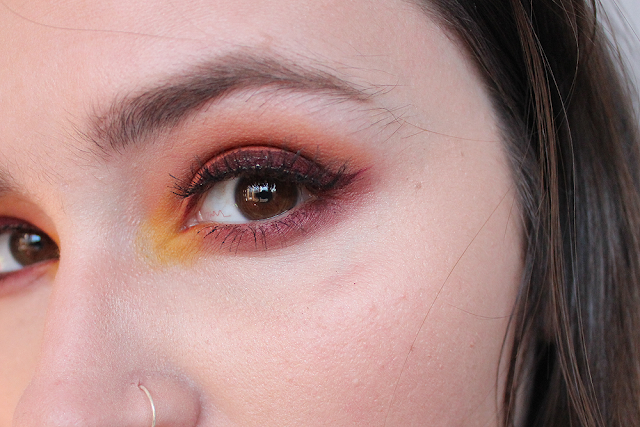
 (Lid: Forest | Inner Corner: Tangerine | Lower Lid: Ash | Crease: Sorbet | Brow: Chiffon)

Overall: I am such a huge fan of this palette! It has such a great mix of mattes, metallics, shimmers and everything in between. The two bottom rows of this palette alone should make you want to run out and buy it. That being said, if you already have the first one, you probably don't need this but if you are looking for a fab all-around palette, this is SO it!

LORAC | Buy - $59

Halloween | Talk Nerdy To Me

$
0
0
Hellllllllo loves! I am back with a VERY easy makeup for any of you last minute babes. All you need is a wig, your basic makeup, some glasses and you're good to go!


To get this look:

  • Moving to the eyes, I applied MAC Paint Pot in Painterly as a nice base for my super natural eye look. In the crease, I popped Milk Chocolate from Too Faced's Chocolate Bar Palette. For the lid, I took White Chocolate from the same palette and patted it on my lid for a subtle cut crease look. Lastly, I applied Ardell #220's with no liner. I absolutely LOVE these lashes and thought they fit perfectly for a natural wispy look.
  • For the awesome fake freckles (I love, love, love freckles!), I took a small detail brush and dipped it into It Cosmetics Build-A-Brow in Taupe and applied them all over the nose bridge and across my cheeks. 
  • For the lips, I took ColourPop Lippie Stix in Pepper.
  • Onto the best part - the pimples! I had so much fun creating these. I started by taking a red shadow (Destroyer from Kat Von D Mi Vida Loca Remix) and dotted that into the places I wanted the pimples to be. Then I applied a dot of concealer in the middle of them and let it dry completely. Then I went over them with a mix of a yellow shadow and bright green shadow and dotted that over the concealer. Lastly, I took a grey and shadowed underneath the yellow part to create an illusion that they were popped up. 
  • As for the glasses, those are my actual prescription glasses! They're the large Wayfarers from Zenni Optical.
I hope you guys like this look! I had so much fun creating it. Side note: I shouldn't have to do this but just in case. This makeup is of a typical "movie" nerd. This does not in any way reflect anyone that could be considered a nerd nor do I believe that if they identify with being a nerd, that this is what they look like. Everyone is beautiful! :) This is just my take on your typical geeky, movie generalization of a nerd. PHEW. Alright!

See you guys in my next post! :)

Currently Lovin' | Fall Favorites!

$
0
0
Hey guys! It's been quite awhile since I've done a monthly favorites post so I decided to combine all my favorite beauty products from the last few months and put them all into one mega fall favorites post!

  • BECCA x Jaclyn Hill Champagne Pop - I know, I know. But I promise, the hype is real, y'all. When you put two powerhouses that are just amazing at what they do like BECCA Cosmetics and Jaclyn Hill together, you should awesomeness to the tenth power. Champagne Pop is buttery soft and incredibly pigmented. The only downside is that this highlighter has broken and crumbled apart on me twice (HEAVY SOBS) and I've never had that issue before and have always been able to fix it with some alcohol. But still. Other than that, I'm in love with this highlighter! PS. It's really flattering for pale skin even though it's a pale gold color!
  • Ardell #220 Demi Wispies - I am SO late to this lash train. I know a lot of beauty v/bloggers obsess over these particular lashes and now I know why. They're just the right amount of wispiness I like without being too dramatic. They apply very easily and I love the invisible band.
  • ColourPop Ultra Matte Liquid Lipstick in Chilly Chili - This color is PER-FEC-TION! I'm obsessed with it. I'm almost positive ColourPop changed their formulas on their liquid lipsticks because this is much easier to apply and a little bit thicker and creamer than their previous formulas. The color is this super gorgeous muted plummy brown and I can't get enough!
  • Kat Von D Everlasting Liquid Lipstick in Damned - If we're talking dark lippies, Kat's Damned is a must-have! Damned kind of follows along with Chilly Chili in that they both have that gorgeous brown undertone that I've been loving except Damned is more of a black cherry. Kat always nails it with her liquid lipstick formulas: super creamy, pigmented and long lasting.
  • TASK Essential Skin Feed O2 Hydrating Moisturizer - My absolute favorite moisturizer! I became a believer in this after a night of insane makeup projects going on. After all the makeup was off, my skin felt dried out and almost chapped. I applied this moisturizer on before going to bed and when I woke up, my skin felt amazing! Total 360. This moisturizer does take a little while to soak into the skin so I do recommend putting it on before bed but oh man, guys. It's awesome!
  • Phace Bioactive Illuminating Serum - This serum has been amazing! It's a corrective and protective serum to give you glowing, firm, younger-looking skin. It's designed to diminish the appearance of age spots, sun spots and acne marks. I like to apply this after I wash my face but before I moisturize. Sometimes I even mix this into whatever moisturizer I'm using at the time (ahem, the one above!) and apply like that. 
  • It Cosmetics CC+ Cream in Light - If you couldn't tell by it being featured in almost every single look I've done lately, this has been my jam! It's light on the face but provides amazing coverage. I apply it with a Beauty Blender for a flawless, natural look. 
  • Victoria's Secret Heavenly Perfume - Every time fall comes around, I pop this out of closet. The scent is a spicy mix of chocolate and cinnamon and reminds me of the holidays for some reason. Fave cold weather scent!
  • Essie Gel-Setter Top Coat - I'm always on the lookout for a good top coat that keeps my mani from chipping. Let's be real. I'm rough with my hands between playing with my son and dishes and - well, the list goes on and on. This top coat by Essie dries pretty fast and leaves my nails hard and shiny. It definitely prolongs my mani by a few more days.
  • Essie Frock N Roll - Ahh. This polish is SO gorgeous! Frock N Roll is from the Fall 2015 and is a weird grey-ish blackened plum with a galaxy of silver flecks in it. Hands down, my favorite polish from Essie in a veryyyyy long time. 
  • It Cosmetics CC+ Concealer in Fair - Just like the CC+ cream above, this has been my go-to concealer for awhile now. This partners so well with the CC+ cream to get a really nice flawless look. I absolutely love the application which is a cold "spoon" tip. Not only does this conceal but it also is an anti-aging serum, moisturizing eye cream, eye brightening serum, skin-perfecting primer, color corrector, sunscreen and a full-coverage concealer!
  • Neutrogena Makeup Remover Wipes - Stop reading this post and RUN out to buy these babies right now. I'll wait. Okay. Back already? Amazing, aren't they? I've never experienced a makeup removing wipe like this one. It's so gentle but removes EVERYTHING - including lash glue (that's the biggest pain in the ass to get off), waterproof liner and mascara! Check out how it removed my entire skeleton makeup look here!
  • LORAC Mega Pro Palette 2 - I've been obsessed with this palette the day I bought it. It's a great palette for someone who wants a little bit of everything all in one. The metallics and shimmers in this palette are INSANE and I'm not even that into shimmers and metallics, y'all. I just reviewed this here!
Phew! Alright, babes. Those are my current fall favorites. What are yours? 

+ Some products have been sent to me for review but all opinions are 100% my own.

Baby | Snackin' On The Go With Sprout®

$
0
0
Disclaimer: This is a sponsored conversation written by me on behalf of Sprout® Organic Baby Foods. The opinions and text are all mine.

My one year old is a total snacker. A little bit of this, a little bit of that - as long as he can hold it in his hands and feed it to himself, he's happy.

Our current to-go bag situation.

As proud as I am of his newly found confidence in doing EV-ER-Y-THING himself, it can make snacking-on-the-go a little messy. Okay, really messy. God forbid I help him with anything, even so much as taking his snack out of it's container to hand to him because it'll cause a total fit that really creating a bigger mess than it would just letting him do it himself. Hashtag mom problems!

On top of finding a snack that keeps the mess factor down (I'm looking at you, blueberries) and is easy for him to feed himself, I'm looking for something healthy. Almost seems impossible, right?


Thank goodness for Sprout® OrganicToddler Cereal SnacksSprout® Organic Food's pride themselves on creating delicious, healthy foods for the entire family, using organic ingredients. They believe in: nourishment without compromise, empowering people with transparency and a better future with organic foods.  

The Cereal Snacks come in three different flavors to choose from - Red Berry & Beet, Orange Fruit & Carrot and Purple Berry & Carrot - there's a little something for everyone. Hunter's absolute favorite is Purple Berry & Carrot!


These certified organic "multigrain pillows" are naturally sweetened (no added sugar!) and are made with non-GMO fruit and veggies into one yummy snack that my son loves. While I'm excited the packaging is BPA-free and there are no additives nor preservatives in these snacks, I'm just relieved I can pronounce the ingredients on the food label. That's because Sprout®  prides themselves on having honest flavor names that actually match the ingredients list. No guessing games here! Sprout® is also the only baby/toddler food brand out there right now that doesn't use acid preservatives that can sometimes hurt our little babes tummies.


Each Sprout® Cereal Snacks box comes with five packets to make snacking on-the-go easy-peasy - just the way I like it!

What do you look for in a snack for your child?


Disclaimer: This is a sponsored conversation written by me on behalf of Sprout® Organic Baby Foods. The opinions and text are all mine.

#BBCChallenge | Fall

$
0
0
Hey love muffins! It's the end of the month, so you know what that means!? It's the Beauty Blog Coalition Challenge time! This month's theme was simply fall which was a lot harder than one would think. I couldn't make up my mind on what I wanted to do.


How to get this look:

  • Starting off with my face, I took my good ol' faithful It Cosmetics CC+ Cream in Light and applied it all over my face with a damp Beauty Blender.
  • After foundation, for some reason, I always go to my eyes. I like to start off with a base (like MAC Paint Pot in Painterly) to neutralize everything out.
  • I decided to play with the Too Faced Chocolate Bar Palette for this look. I started with the shade Milk Chocolate in the crease.
  • Then I took Cherry Cordial and placed that out the outer lid and inner lid but left the middle of the lid bare (for now) and lightly blended it into the crease.
  • For the middle of the lid, I wanted a nice pop of gold so I took Creme Brulee (literally the prettiest gold like, ever!) and packed that into the middle and lightly blended it into Cherry Cordial.
  • I brought Cherry Cordial down to the lower lid and put Creme Brulee in the middle of the lower lid as well and blended that out.
  • I finished my eyes with Ardell #220s and Tarte Lights, Camera, Lashes Mascara.
  • For brows, I used Anastasia Beverly Hills Brow Wiz in Brunette and combed it out. I have naturally full brows but sometimes they lack a little shape. This is perfect to pull everything together.
  • Back to my face, I applied It Cosmetics CC+ Cream Concealer and then set it with the highlight part from Smashbox's Master Class 3 Palette.
  • From the same palette, I used the "contour" to well, contour with and the "bronze" part to warm up my look.
  • For my lips, what's better for fall than a dark lip? Kat Von D's Everlasting Liquid Lipstick in Exorcism! 
So, ladies and gents, that's my take on a fun, fall look! Make sure to check out the other gorgeous ladies from the Beauty Blog Coalition taking part in this challenge and show them some love! 

Halloween | The Ultimate Guide

$
0
0
Hey pumpkins! Halloween is this weekend, can you believe it!? If you're still stuck on a costume idea, I've got you covered! I've put together a roundup of all my Halloween looks from this year as well as past years (#throwback). I've also included some past nail tutorials and looks in case your nails need some lovin' as well.

If you recreate any of these looks, let me know and tag me wherever you post it! :) Happy Halloween, chickies!


Can I please go back in time to having time to do all of these? So much fun!

Don't have time for nail art? Try these NCLA nail wraps in Oculus and Calavera

Cooking With Dr. Pepper | Frosty Pep

$
0
0
|| This post is sponsored by Dr. Pepper and Lip Smackers.

Happy Halloween, pumpkins! Anyone having a party to celebrate tonight? If you've got the costumes and decorations, I've got the perfect drink for you to make! It's easy to create, tastes amazing and looks a little creepy towards the end. I mean, who doesn't want all of that in a drink, am I right?


Today we're putting a fun twist on the classic soda float with Dr. Pepper by creating their signature Frosty Pep drink!

You Will Need:

  • 1 scoop vanilla ice cream (per serving)
  • 1 12 oz. can of Dr. Pepper  (per serving)
Let's do this! Place one scoop of vanilla ice cream in a tall glass (or pumpkin goblet if you're feeling Halloween-y!).Gently pour one bottle/can of cold Dr. Pepper over the ice cream. Stir until it's nice and creamy.


How easy was that!? Once the foam settles it almost gives off a creepy brain look - perfect for Halloween! You can find all the ingredients and more at your local Rite Aid. Find your local Rite Aid here.


Psst. Rite Aid also has all of their Halloween decorations/costumes 50% off right now for all your last minute needs! :)

How-To | Fall Waves W/ The Beachwaver S1

$
0
0
Hey sugars! Today I wanted to share with you one of my absolute favorite hairstyles for fall - fall waves! You didn't think waves were just for summer, did you? Waves in general are very flattering for all hair lengths and are super easy to achieve.


Not sure where to start? Sarah Potempa (of The Beachwaver) has put together an incredibly easy tutorial using The BeachWaver S1 to achieve this look so let's get to it!

  • So first off, I like to rock the waves hairstyle with second day hair. If you just washed your hair or your hair is a little greasy, spray some dry shampoo into it. This will create texture to hold the waves a little better. Recommendation: Batiste Dry Shampoo
  • Alrighty. So now we're going to split your hair down the back and bring it forward so it's in two sections. Then we're taking the top half of those sections and twist it up to the top of our heads and out of our way for now so we can work on the bottom half first.
  • Using The BeachWaver S1, we're going to take about an inch section of hair and clamp your hair at the bottom. Tip: I like to leave about an 1.5" of hair at the end of the wave to give it a messier look.
  • Then press the arrow pointing away from your face to start the rotation of the Beachwaver S1 and release the arrow to stop it.
  • Continue until your finish the bottom half of your head and then start on the top half.
  • Once you're done, let the curls cool and then brush them out. I like to use my fingers to brush them out. Hairspray them and you're good to go! :) Recommendation: Nioxin Niospray Extra Hold Hairspray

I love using The Beachwaver S1! It was very easy to control and the waves achieved using it are so, so gorgeous. What's your favorite way to style your hair in the fall?

You can find The Beachwaver S1 at your local Ulta Beauty or at Ulta.com - $129

|| #StyleHunters4Ulta  #UltaTrendAlert 
* I was provided The Beachwaver S1 from Ulta Beauty/People StyleWatch but all opinions are my own.

Michael Todd Soniclear Elite Deluxe on EVINE Live!

$
0
0
* Sponsored

Hey dolls! Now that it's November, who's starting their Christmas shopping? If you have a beauty lover in your family or heck, even looking to treat yourself and are looking to save some moola, keep reading! I've been a huge fan of Michael Todd ever since I tried his Pumpkin Nutrient-Rich Facial Mask a few years ago so I'm excited to share this total steal going on RIGHT NOW!
Michael Todd is premiering their Soniclear Elite Deluxe on EVINE Live and evine.com featuring a special Michael Todd Today’s Top Value – EVINE Live’s best value of the day!
If you aren't familiar with the Soniclear Elite, it will refresh and revive the look of tired skin with its sonic-powered, antimicrobial brush heads. The complete body, pedi and face system with an optional C-Boost™ Technology mode, make this "youth machine" the go-to cleansing and exfoliating tool for all skin types. Especially suited for aging skin to slough off dead dulling skin cells while deep cleaning the pores of dirt and makeup for a refreshed appearance and a more radiant complexion.
Great for gifting, Soniclear Elite Deluxe will be offered in eight different colors! The Deluxe set can be yours for less than $129 plus S&H and will include:
  • Soniclear Elite Sonic Powered Skin Cleansing System with C-Boost™ Technology, Charging Stand and Power Adapter
  • Antimicrobial Face Brush Head
  • Antimicrobial Body Brush Head
  • Pedi Treatment Head
  • Shower Extension Arm
  • Hard Shell Travel Case
  • Shower Caddy
This special price is good for a limited time through 9:59pm ET 11/4/15.  
Michael Todd is premiering their Soniclear Elite Deluxe on EVINE Live and evine.com on 11/3 at 10pm and 11pm ET and 11/4 at 4am, 5am, 6am, 10am, 2pm and 7pm ET.
Tune in to watch the show live on evine.com or find EVINE Live on your local station.  You can also buy it now or shop all Michael Todd products on EVINE Live.

Holiday | Simple Glam Holiday Tutorial + Giveaway

$
0
0
This shop has been compensated by Collective Bias Inc. and its advertiser. All opinions are mine alone. 
|| #LookByMilani #CollectiveBias


Guys. It's official! It's November and the holidays are literally right around the corner. Are you ready?! If you've got the outfit, presents and food but are unsure about a go-to holiday glam look, I've got you covered! And the best part? The majority of the products used are from Milani which you can find at your local CVS. PSST. Stay tuned for a giveaway at the end of this post!

Milani Products Used:

Simple Glam Tutorial:


  • To get this look, I started off by applying my favorite primer all over my face. Moving onto the eyes, I applied the Milani Eyeshadow Primer to both lids and let set for 30 seconds. 
  • While they setting, I started filling in my eyebrows with the Milani Stay Put Brow Color (in Brunette). Literally, my most favorite brow product right now. It was so easy! It comes with a dual-ended brush that has a spoolie on one side to brush out your brows and a slanted brush on the other side to apply the product in thin, brush-like strokes.
  • Next, I went back to my eyes and brushed a "same as my eyelid" colored shadow on my lid. This helps to blend any shades you put on your lid a little bit easier.
  • For my crease, I went in with a nice warm tan shade to create a little depth. I applied it with a fluffy brush in a windshield wiper motion.
  • For the lid, I patted on a nice white shadow. I really wanted to brighten up the lid but still stay subtle. I then lightly blended it into the crease for a seamless transition.
  • For my simple but sleek cat-eye, I took the Milani Fierce Foil Eyeliner (in Black Gold) and lined my lid and then winged it out. Easy-peasy!
  • Once your eyes are complete, you can start on your foundation, bronzer and blush. I like to do this after my eyes are done so I can clean up any mistakes or fall out before continuing.

 Giveaway Time!

It's giveaway time! Enter below for your chance to win one of three prizes: a $500 gift card and two $250 gift cards to CVS. 

#LookByMilani - Holiday Looks with Milani at CVS

What is your go-to holiday look?

Inglot Black Swan Lipsticks (#435, #436 + #437) | Swatches + Review

$
0
0
Guys, it's November. Who wants to freak out with me? According to my calculations (aka the calendar on my phone), there are a little less than seven weeks until Christmas and guys, I have the perfect gift for the beauty lover in your life - or yourself. Let's be honest. Either or!

Inglot recently came out with three new matte lipsticks as part of their new Black Swan Collection for Fall/Winter 2015 and they are perfect for winter! Each lipstick contains Vitamin E, macadamia oil and avocado oil to moisturize your lips.


  • #437 - a matte black. I'm just going to come out and say it: I never thought I could wear black lipstick until I tried this one. I know it's just a simple black matte lipstick but there's just something about it that makes it quite flattering. The formula on this lipstick is a little tricky though. The lipstick itself is hard. That's the best way I can describe it. It doesn't seem to effect application of the shade much (ie: no pulling, no patchiness), but when I put it to my lips, that was the first thought that I had. It didn't feel soft to my lips at first. Once the shade is on your for a few seconds, it kind of melts and becomes even more smooth and more wearable. 
  • #436- a grey taupe with purple undertones. I love a good grey lipstick. It's so different from the typical dark lips for the colder seasons but somehow still fits in. #436 had the same formula as #437. The stick itself was hard to the lips but it didn't effect application. It's just a different feel to it. Once the shade is on your lips, it feels absolutely fine and is smooth and opaque.
  • #435 a blackened plum. When I first saw this out of the tube, I thought it was another black or super dark grey. I was SO surprised when I swatched it and it was a gorgeous dark plum! Again, same MO as the last two lipsticks: hard but smooth and opaque once on the lips. I absolutely love, love, love this shade! On the lips, it looks pulls black but you can see the plum as well.
Wearing #435
Wearing #436
Wearing #437

Overall: How gorgeous are these shades? I have to admit that all of them are my favorites and there were no weak players in the group! The consistency of these lipsticks took some time getting used to but they didn't effect the application of the lipsticks at all. I didn't experience any patchiness or pulling even though the stick itself felt hard to the lips. All three lipsticks were extremely opaque, smooth and wearable. My lips definitely felt moisturized as well! I would like to note that I think #436 is matte but #435 and #437 are more of a cream finish.

Inglot USA Buy ($19)
* Press Sample

BoxyCharm | October Box - Faces of the Moon

$
0
0
Hi loves! How's your week going? It's been sleepless over here. Poor Hunter is teething so no one has been getting any sleep. Fingers crossed they pop through soon so we can get more shut eye. Onto the post! 

I have a review of the BoxyCharm October box! What's BoxyCharm, you ask? BoxyCharm is a beauty subscription that comes to your doorstep every month with 4-5 full size luxury items for $21 a month. While that might sound a little more expensive than other subscription services, consider that you're getting guaranteed four full size products every month while compared to Ipsy where it's only $10 but they're usually smaller samples. The promise of full sized products alone totally got me hooked on it!

October's theme was Faces of the Moon which is a pretty unique theme, am I right? This box is all about embracing who you are but also letting the beauty of "all your faces" show. Love that! 

  • Palmetto Derma Rejuvenating Antioxidant Mask ($64) - Let's start with the most luxe product in the box! At $64, this mask is about three times the box itself so you're already getting your money's worth with this product alone. This clay mask gently purifies by cleaning your pores and skin. I love that they put a universal mask in the box. Sometimes you can receive skincare and it's not for your skin type so it's kind of a waste. This mask, however, can be used on all skin types.
  • Bellapierre Cheek and Lip Stain ($20) - This stain is great for people on-the-go as it combines two products into one. You can apply the lip stain as you would a lip balm or dot it on your cheekbones and blend in for a nice, flushed look. I like that this stain is very natural looking. I've had ones where I've gone to dot it on my cheeks and there's been bright red dots that would not blend.
  • Lord & Berry Line Shade Eyeliner ($18) - I love trying out new brands! This eyeliner is formulated with kajal and kohl to provide deep, rich color. I like that you have time to smoke it out before it becomes unbudgeable. It's really long-lasting and doesn't flake away.
  • Cult Cosmetics Nail Polish in Boneyards ($12) - Currently rocking this on my nails right now! Boneyards is a smokey grey polish that screams fall to me! Consistency is nice and was opaque with two coats. Cult Cosmetics is also a new brand to me. I honestly got them confused with Cult Nails at first and then did some research to find that they're two different companies.
  • Doucce Punk Volumizer Mascara ($24) - This mascara is not your typical mascara. First off, mascara packaging itself is kind of clunky but for a good reason: that's to house the plump mascara wand inside! The consistency of the mascara wasn't too thick or wet and really lifted my lashes while elongating them. I was surprised!
Overall: This box had a lot of products and brands I had never heard of which I loved. I'd have to say my favorite product from this box would hands down be the Cult Cosmetics nail polish. I'm drooling over the color! What's your favorite product from this box?

BoxyCharm | Shop + $21 a month
* Press sample

YoungBlood Perfect Pair Mineral Eyeshadow Duos | Swatches + Review

$
0
0
Hi babes! Today I'll be reviewing YoungBlood Mineral Cosmetics Perfect Pair Duos in Charismatic, Virtue, Graceful and Desire - part of their Holiday Collection!

YoungBlood Cosmetics started when creator Pauline Youngblood, working as an aesthetician, noticed that her patients had severely traumatized skin from harsh laser treatments, acne, cosmetic surgeries and rosacea and had little options when it came to makeup that wouldn't clog their skin. Pauline worked with chemists to come up with natural mineral cosmetics that would cover raw, inflamed and/or discolored skin while still letting it breathe. In 1996, YoungBlood Cosmetics was born!

Charismatic
  • English Tea - a matte chocolate brown. I need to just warn you guys now. All of these shadows are amazing! So get ready for a whole bunch of "amazing""super" gorgeous" and "ajsdkasjdksad" in these reviews. But seriously. English Tea is everything I could ask for in a velvety smooth chocolate brown matte. So buttery soft, opaque and little fall out.
  • Calla Lilly - a shimmery light peach champagne. Can I just marinade in this shade? Is that weird? Calla Lilly is stunning. Again, incredibly opaque and so, so soft. This is a gorgeous highlight as well!
Desire
  • Pink Rose - a light pink matte. I was expecting this to be really chalky but was very surprised with how soft and smooth it applied. It also held its own which is hard sometimes to do when you have a light matte. Sometimes they can kind of fade, especially when blending with another shadow. Pink Rose is very opaque (although you probably can't see it since it's basically my skin tone) and smooth to apply.
  • Iris - a dark purple satin. Can we just talk about this for a second. Hello! Iris is a gorgeous opaque, pigmented smooth-as-buttah shade that is just so, so stunning. It also blends out like a dream!
Virtue
  • Pure -  a white matte. I always get nervous around matte whites because they almost always never play nice. They're usually dry, chalky and fade after a few hours of wear. Not for Pure! Pure is incredibly opaque for a white matte and no where near chalky. In fact, it's smooth like the others and applies very well with no kick up.
  • Passionate - a shimmery maroon with a subtle gold duochrome. When I opened the compact and saw this, I knew it was going to be awesome! I can't even begin to describe how smooth this was to apply. It is jam packed with pigmentation and is opaque with one swipe! This applied like a dream!
Graceful
  • Apricot - a bright peach shimmer. I can't get enough of this. Slightly more peach-ier than Calla Lilly from the Charismatic duo. So buttery soft and smooth to apply.
  • Azure - a sea blue satin. I drool over this blue! Again, buttery soft, no fall out and so nice to apply. I can't get over how opaque and how it didn't sheer out over the course of the day. 
L-R: Graceful, Desire, Virtue and Charismatic

Can you guys tell I'm a huge fan? I'm almost positive this post could've turned into a drinking game for the amount of times I said "buttery soft" and "amazing". There's nothing better when you love a company's product and they love you back. As you can read from how YB got started, they really care about their customers. That being said, I absolutely loved all four of these duos and highly recommend checking them out!

YoungBlood Mineral Cosmetics | Shop ($28)
* Press Sample

Star Wars Jedi Makeup Tutorial + Rite Aid & CoverGirl Beauty Sweepstakes

$
0
0

Hello my little Stormtroopers! Have you heard?! Rite Aid and CoverGirl are holding a Beauty Sweepstakes that is currently going on right now to November 26th. You can enter via Twitter or Instagram by uploading a photo of YOUR light side or dark side beauty looks using the hashtag #RiteAidBeautyForceSweeps! You must be a follower of @RiteAid at Twitter and Instagram and your account must be public. The two grand prizes winners will receive CoverGirl Star Wars products worth $360!

Here is my take on the Jedi look created by the ever-so-talented Pat McGrath for CoverGirl. I was going for a more wearable Jedi look (well, can't say I thought I'd ever say that!), complete with a hair braid headband. Legit. My fiance came out of the room and was like, "Is that your hair across your forehead?" I was like, "Yes. My Jedi would totally rock this." and then he walked away from me. Pff. Men.

Products used for this look!

  1. First things first, we're going to prime our eyelid with our favorite primer. This helps eyeshadows stick to the lid without creasing and moving throughout the day. It also helps neutral out our lid.
  2. Next we're taking #3 from the CoverGirl Notice Me Nudes Eyeshadow Quad and we're popping that into our crease. Depending on how much drama you're looking for, you can take this up above your crease or just leave it in the crease and blend it out.
  3. Now we're going to take #2 from the same quad and using a flat shade brush, we're going to pat the shadow on the sides of our lids but leave the middle as empty as you can.
  4. Next we're going to take #1 from the same quad and pat that into the middle of our lid and very gently blend it out.
  5. We're going to add some dimension to this look by adding #4 into our outer v of our eye and blend it into our crease.
  6. I wanted a little lightness in my inner corner so I just took #2 on my ring finger and patted that into my inner corner.
  7. Moving onto my lower lid, I took #4 onto the outer part of my bottom lid and blended that into #3 towards the inner corner.
  8. (Optional) Take a cotton ball with makeup remover and wipe away any glitter fall out under your eyes.
  9. Finishing up on the eyes, take the CoverGirl Star Wars Super Sizer Mascara and coat your lashes to your liking. I personally like to apply a little more mascara on the outer edges of my lashes to give the illusion of more volume. (Optional: I added false lashes to my look on top)
  10. Lastly, apply the CoverGirl Star Wars Colorlicious Lipstick in Gold and go kick some butt! :)


Looking for inspiration? Make sure to check out CoverGirl's Tumblr for ideas! I can't wait to see your looks! :) Good luck, dolls!

* Sponsored by Rite Aid & CoverGirl.

Inglot Matte It Be Eyeshadows #306, 307, 308, 309 + 310 | Swatches +Review

$
0
0
Hey babes! Today I'll be showing you the five Freedom System new matte eyeshadows from the Inglot Matte It Be Collection released last month. This collection also includes four new shades of Inglot's AMC Eyeliner Gels, two new kohl shades and eight new matte O2M nail polishes. Let's check them out!

  • #308 - a matte mulled wine
  • #306 - a matte dark grey.
  • #309 - a matte oyster pink.
  • #307 - a matte light indigo blue.
  • #310 - a matte heather grey.
Overall: I have a confession. I'm SO in love with these Inglot mattes! I'm new to their shadows and can't believe I haven't tried them until now. Instead of reviewing each one, I can honestly just sum up all of them since they all performed the same. Each one was extremely soft and pigmented. I will admit they were a teensy bit on the dry side but it didn't affect the application at all and tends to be the norm with mattes.

(L-R: 306, 309, 307, 310 and 308)

(Middle lid: 309 | Outer and inner lid: 307 | Outer v: 306 | Inner corner: 308 | Lower lid: 310)
(This look will be up this weekend - using Inglot shadows and lipstick!)

Inglot USA | Shop $6
*Press samples

All Greyed Out

$
0
0
Hi guys! A few days ago, I was playing with the Inglot Matte It Be shadows and came up with a pretty, maybe not-so-wearable for everyday but still fun to play with look. It's a little dramatic and what I like to call "zombie chic" but I'm diggin' it.


  • FACE | It Cosmetics CC+ Cream (in Light) applied with a damp BeautyBlender. It Cosmetics CC+ Concealer (in Fair) to conceal. Bronzer, contour and highlight from Smashbox Master Class 3 Palette - also used to set foundation.
  • EYES | Inglot Matte It Be shadows were used for the whole look. I used #309 in the middle of the lid and #307 on the outer part and inner part. For the outer v to deepen the look, I used #306. Lastly, for the lower lid, I used #310 and blended it out to keep it smokey. Lastly, I used #308 for the inner corner. Tarte Lights, Camera, Lashes Mascara to finish off the eye look.
  • BROWS | Anastasia Beverly Hills Brow Wiz in Brunette
  • LIPS | Inglot Black Swan Lipstick in #436


Mint Chocolate Chip

$
0
0
Hey gorgeous! So. I'm sitting here, guzzlin' sippin' my coffee this morning (baby bear was up six times last night!) and I'm looking at these pictures and am a little disappointed in how they came out. I really wish the colors in them would pop out the way they are in real life. Do they look washed out to you? Maybe it's just my screen. Whomp whomp. I've been using natural light and sometimes it looks great; sometimes it doesn't. In my last post, a wonderful reader pointed out a color difference in my foundation when in real life, it matched and I always want to make sure you guys see what products and colors look like in real life. I never want you to be like, "Hey! That doesn't look like that!" Sigh. With that, any suggestions for lighting/ring lights? I've heard they make all the difference when it comes to making colors true to life. Let me know in the comments below! 

Anyway, onto this look. I really wanted to dip into my vault of barely palettes and pulled out the Too Faced Joy To The Girls Palette from last year. Can I just say that I can't believe I don't use this more often? Swoon, swoon, swoon! I came up with this mint chocolate chip look using the "spotlight" method (putting a bright/light/metallic/different color shadow in the middle of the lid to create a spotlight) and am really happy with the way it turned out. 

BEWARE: I went a little cray cray with the pictures!
  • FACE: CoverFX Custom Infusion Drops (in N25) mixed with Josie Maran Daily Moisturizer applied with a damp BeautyBlender. Smashbox MasterClass 3 Palette for highlight, contour and bronzer. MAC Melba for blush.
  • EYES: Too Faced Joy to The Girls Palette - Cookie Dough in the crease, Mulberry on the inner and outer corners of the eye with Joy (dampened) and patted onto the middle of the lid. Mulberry brought down to the lower lid. Tarte Lights, Camera, Lashes Mascara for lashes. Anastasia Beverly Hills Brow Wiz (in Brunette) for brows.
  • LIPS: Kat Von D Everlasting Lipstick in Lovesick

#BBCChallenge | Orange, Red + Yellow

$
0
0
Hey guys! I hope you all had an amazing Thanksgiving! We are back with our monthly #BBCChallenge! This month's theme is Orange, Red & Yellow - inspired by fall leaves. If you aren't familiar with the BBCChallenge it is a monthly challenge myself and the ladies of The Beauty Blog Coalition put together to challenge ourselves to create something awesome that we might normally not try out.
  • Face: CoverFX Custom Cover Drops (in N25) mixed with Josie Maran Cosmetics Argan Daily Moisturizer. It Cosmetics CC+ Concealer in Fair. Bronzer, Contour, Highlight and Blush from Smashbox Masterclass 3 Palette.
  • Eyes: Kat Von D Mi Vida Loca Remix Palette > Lid: Analogue, Outer V: Vox + Rewind, Crease: Noble mixed with Analogue,  Inner Corner: Fran, Lower Lid: Rewind. ColourPop Ultra Matte Liquid Lipstick in LAX for the liner. Ardell Demi Wispies for lashes. Jordana Extreme Lash for mascara.
  • Brows: Anastasia Beverly Hills Brow Wiz in Brunette
  • Lips: ColourPop Ultra Matte Liquid Lipstick in Limbo
Make sure to show some love to my beauty babes that took part in this month's challenge as well:

Giveaway | A Few of Our Favorite Beauty Things!

$
0
0
Hey chickies! A total of 35 fabulous beauty bloggers have all teamed up to give away "A Few of Our Favorite BEAUTY Things!" to our readers! It was created to be a fun blog hop to give back to you -- our readers -- and hopefully help you discover new beauty blogs and makeup lovers along the way!
  A Few of Our Favorite Beauty Things //   Holiday Giveaway // Blog Hop // #holidaygiveaway #giveaway

Here's How it Works: Each of the 35 blogs participating in this blog hop are giving away their own bundle of beauty items on their blog. Yes, you heard that right -- 35 separate giveaways that you have a chance to win! So after you've entered my giveaway, make sure you hop to all the other blogs (linked below) for more beauty products that you could win! It Gets Better: As if that wasn't awesome enough...we've added a little something to make the giveaway even sweeter! For those gals who can't pass up on the chance to win beauty products...if you enter into all the giveaways in the blog hop than you're eligible to enter to win a $200 eGiftcard to Sephora or Ulta (winners choice!). If you live somewhere where Sephora or Ulta doesn't ship, no worries! You'll be given the $200 via PayPal to use at whatever beauty store you have in your country! International Readers: There are a few blogs who do not have their giveaway open worldwide, but you can still enter to win the grand prize giveaway! For all the blogs in this hop that do not have their giveaway open worldwide, all you have to do is check out their giveaway, complete the one required entry, and leave them a comment on their giveaway post letting them know you're international but still did the required entry so that you can have a chance to win the grand prize!
You got all that? Any questions, just ask below! Let's get into this hop!


In the event that you get an ERROR message when clicking on any of the links below, try clicking on the HOME page of that blog. Or come back later and try again. There are often hiccups that happen in the beginning of a pre-scheduled blog hop such as this. Thank you for your patience!

Holiday Party Survival Guide with Ulta Beauty + People StyleWatch

$
0
0
This post is sponsored by Ulta Beauty + People StyleWatch. 
|| #UltraTrendAlert #StyleHunters4Ulta


Can you believe it? The holidays are officially upon us! Who's ready to party!? Whether you're hosting your own or attending a few, as always, your girl has got you covered to help survive the holiday parties with a guide of my favorite beauty products. From kisses under the mistletoe to preventing flashback in photos to getting that stain out of your skirt - quick!, it's all here:

Tip #1: Let's take a selfie! Make sure you look your best all night long with a great primer, foundation and finishing powder that doesn't have a white cast with flash photography.

My favorite primer is Smashbox Photo Finish Primer Water ($32). It's very lightweight and creates a nice, smooth, long-lasting base for your foundation. Honestly, any of Smashbox's Photo Finish primers are amazing for photography in general. The primers also come in a variety of different types (light, pore-minimizing, color correcting, etc.) for different skin types and needs.

My favorite foundation for flash photography is Stila Stay All Day Foundation ($44). The best thing about this full-coverage foundation is that it lasts all day (and night!) long without budging, caking up or creasing all the while still looking fab in flash photography. When looking for a foundation that won't give you a flashback, look at the ingredients and make sure to stay clear from foundations containing "titanium dioxide" and "zinc oxide".

Lastly, you'll need to use a finishing powder to set your foundation! Most powders contain mica or silca that can reflect light and bounce it back at the camera, causing the dreaded flashback. I found a great finishing powder is the Tarte Smooth Operator Amazonian Clay Tinted Pressed Finishing Powder ($34) in your coordinating skin color. I'm a huge fan of Tarte's Amazonian Clay collection and found that this was no exception. It's so silky smooth and doesn't crease throughout the day and night. The transparent setting powder from Tarte is also great as well but I recommend using just a little and then setting with a setting spray. With any "transparent" setting powder, it's always a good idea to wet the powder so it doesn't reflect light back at the camera, just in case.

Tip #2: Prep your lips for a night full of action - whether it's under the mistletoe or getting seconds from the food table (I'm the latter!). To get smooth, soft lips, I like to exfoliate my lips while getting ready!

Just rub the lip scrub on your lips before getting ready for the night. Once you're done with your makeup, rub your lips together one last time and then wipe off. Your lips should be nice and smooth! Using an exfoliant is also great when you're wearing a matte lipstick as it gets rid of the dryness that matte lipsticks love hold onto, creating a crumbly look and feel. My favorite lip scrub is the Tony Moly Kiss Kiss Lip Scrub ($9.99). I mean, how cute is that packaging!?

Tip #3: When looking for a lipstick that'll last all night long, I always think of the Stila Stay All Day Liquid Lipsticks ($24). The colors are so gorgeous and smooth on the lips. I never experienced bleeding or feathering, even going into the wee hours of the night. My favorite colors are Beso (a bright red) and Pantina (a dusty nude mauve)!

PS. These babies don't transfer on contact, if you catch my drift! ;)

Tip #4: Looking to rock curls or waves for the night? Sometimes they're hard to hold - literally! Without the proper hot tools and sprays, my hair is dunzo and pin straight by the end of the night. SO frustrating! My favorite hot tool for waves and curls is the Beachwaver Co. Beachwaver S1 ($129). Not only does this curler basically do all the work for me but it cuts my getting ready time in half! For even longer lasting powder, once you release your curl, pin it to your head with a bobby pin to cool.

Don't forget hair spray! My fave for a great hold that'll last all night but won't give you a crunchy or heavy feel on your hair is the RUSK W8less Shaping and Control Hairspray ($13.50)!


Tip #5: It happens. We're in a rush getting ready and - blamo! - liner on our favorite shirt! My favorite stain remover? Simple Cleansing Micellar Water ($7.99)! Not only does it get makeup off our faces (and does a killer job, at that!) but it's also a great stain remover. It's tough enough to get the stain out but gentle enough that it won't ruin your clothes. Just take a cotton ball, saturate it with the Micellar Water and place on the stain. Try to dab or (very!) gently rub. It should take it right out!

Note: Please use your own discretion when using this to remove a stain. While I don't think it would ever do harm to it, always test a little before using it full-on.

Tip #6: The best way to survive a holiday party? Relax! I'm known for freaking out before a big party and have noticed that even little things can seem big when in reality if I remain calm, it's not that bad.

A few hours before the party starts, take a bath (or shower) and just slowwww down and take a deep breath before everyone gets there. A fab bubble bath that'll that'll get you in the holiday spirit is the Philosophy Vanilla Bean, Nutmeg Shampoo, Shower Gel and Bubble Bath ($18)! This smells ah-mazing, guys!

Tip #7: Keep a few of these in your bag for quick clean ups! Maybe you forgot to wear waterproof mascara and have been crying from laughter. Or maybe your gloss smudged. ULTA Beauty Double Tipped Cotton Swabs ($1.99) to the rescue! They can get in tight areas (like your lower lash line or lip line) to wipe away smudges without ruining the rest of your look.

Tip #8: Shots, shots, shots! Girllll, the morning after, you're going to need these (and maybe some asprin)! The SKYN Iceland Hydro Cool Firming Eye Gels ($30) are amazing at de-puffing the under eye area! They also help firm and reduce fine lines so it's really a win/win/! Sit back, relax and pop these babies on.

Alrighty, my loves. I hope I've helped you with some great tips on how to survive holiday parties! Have lots and lots of fun, remain calm, be safe and make sure to bookmark this post in case anything pops up! ;)

You can find all of these products at your local Ulta Beauty or Ulta.com!

This post is sponsored by Ulta Beauty + People StyleWatch. 
Viewing all 925 articles
Browse latest View live